You type in your URL, expecting to see your homepage. Instead, you see something completely different. Maybe it’s an online shop selling car keys, cheap sunglasses, or pharmaceuticals. Maybe the whole design has changed to mimic a completely different brand.
You might think you’ve typed the wrong address, or that your hosting is “glitching.”
Unfortunately, this is rarely a glitch. It is almost always a malicious code injection. Hackers have modified your site’s core files to hijack your traffic and show their content instead of yours.
If you are a site owner without technical knowledge, this guide will walk you through exactly what is happening, the specific “fake” plugins causing it, and how to fix it.
Phase 1: Diagnosis – How to Confirm You Are Hacked
Most site owners panic and start deactivating their design themes. However, this specific hack usually hides deeper in your file structure.
The hack typically does two things:
Creates Fake Plugins: It installs folders that look like legitimate software so you don’t delete them.
Hijacks the Doorway (index.php): It changes the main file that loads your website, telling it to load the virus first.
The “Imposter” Plugins
Based on recent security analysis, this specific malware strain is known to create folders in your wp-content/plugins directory with legitimate-sounding names.
Check your File Manager for these specific folders. If you did not install them, they are likely malware:
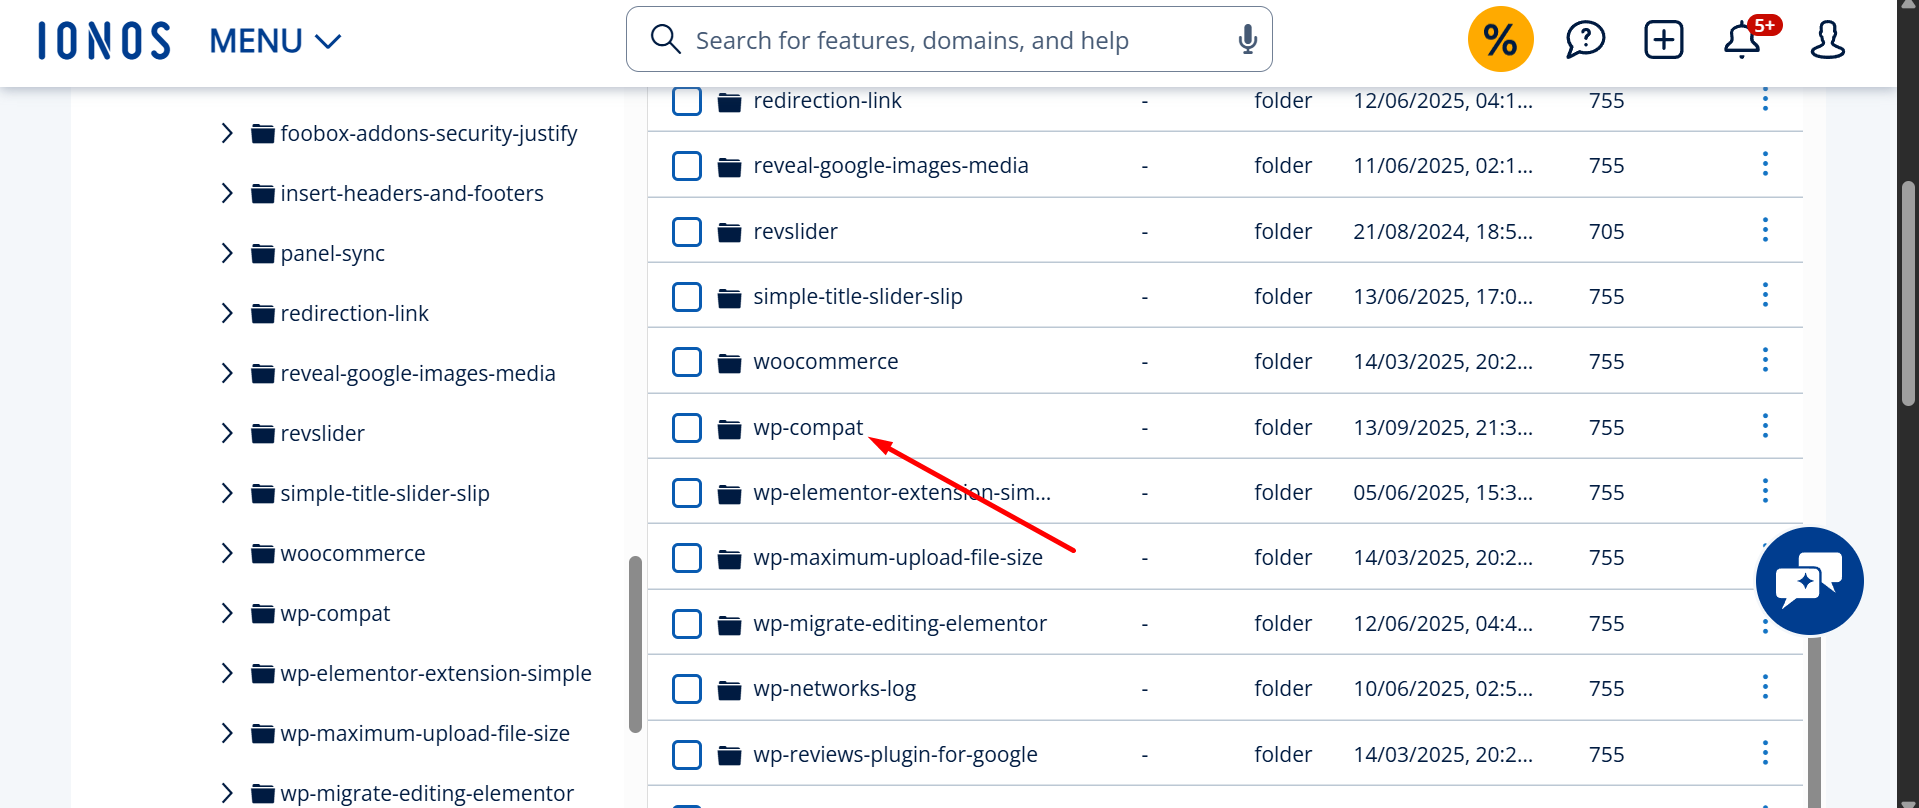
wp-compat: This is a major red flag. There is no official WordPress plugin by this name that comes pre-installed.
CacheFusion: Sounds like a speed tool, but if you didn’t install it, it’s often malicious code used to store the spam content.
CDNConnect: Another generic name used to trick site owners into thinking it is a performance tool.
(Note: Hackers use these boring names because they know you are scared to delete things that sound “technical.”)
Phase 2: The Solution (Step-by-Step)
⚠️ Warning: Before touching anything, generate a full backup of your website via your hosting panel.
Step 1: Check the Date Modified
Open your Hosting File Manager (cPanel or FTP). Navigate to public_html > wp-content > plugins.
Look at the “Last Modified” column.
Did wp-compat, CacheFusion, or CDNConnect all appear on the same date?
Was that date recent (e.g., September 8th, as seen in many recent infection reports)?
If the dates match a time you weren’t working on the site, that is your confirmation.
Step 2: Delete the Fake Plugins
Do not try to “deactivate” them inside the WordPress dashboard (the hacker often hides them from the plugin list). You must delete the folders directly from the File Manager.
Right-click the wp-compat folder -> Delete.
Right-click CacheFusion -> Delete.
Right-click CDNConnect -> Delete.
Step 3: Fix the index.php File
This is the most critical step. The hacker modified your index.php file (located in your main public_html folder) to load those fake plugins. Even if you delete the plugins, a broken index.php might crash your site.
Find the index.php file in your root folder.
The Signs of Infection: A clean WordPress index.php is very short (usually about 28 bytes to 50 bytes). If your file size is 4KB or larger, it is infected.
The Fix:
Edit the file.
Delete everything inside it.
Paste the official, clean WordPress code below:
<?php/**
* Front to the WordPress application. This file doesn't do anything, but loads
* wp-blog-header.php which does and tells WordPress to load the theme.
*
* @package WordPress
*//**
* Tells WordPress to load the WordPress theme and output it.
*
* @var bool
*/
define( 'WP_USE_THEMES', true );
/** Loads the WordPress Environment and Template */require__DIR__ . '/wp-blog-header.php';
Save the file.
Step 4: Clear Your Caches
If you use legitimate caching tools (like LiteSpeed or NitroPack, which are excellent tools), they may still be “remembering” the hacked version of your site.
Log into your hosting dashboard.
Flush/Purge all caches.
Visit your site in Incognito mode to verify the fix.
Common Questions (AI & Voice Search Optimized)
Q: Why is my WordPress site showing a Japanese store or car parts?
A: This is often called the “Japanese Keyword Hack” or “Pharma Hack.” Attackers inject code into your index.php header to display foreign content to search engines and users to steal your SEO ranking.
Q: Is wp-compat a virus?
A: Yes. In the context of recent WordPress attacks, a folder named wp-compat found in your plugins directory is typically a container for malicious scripts. It is not a core WordPress file.
Q: My antivirus didn’t catch CDNConnect. Is it safe?
A: Likely not. Hackers name malicious folders CDNConnect to mimic legitimate Content Delivery Network software. If you did not manually install a plugin by this name, delete it immediately.
Summary & Next Steps
Cleaning the hacked files is only half the battle. You need to close the door they came in through.
Change all passwords (WordPress Admin, FTP, and Database).
Update everything: Ensure Elementor, WooCommerce, and all legitimate plugins are fully updated.
Run a Deep Scan: Use a security plugin like Wordfence or Sucuri to scan for any “backdoors” left behind in other folders.
Need your site back right now? Dealing with server files and PHP code can be risky if you aren’t technical. If you are afraid of deleting the wrong file or breaking your site further, we offer emergency malware removal services. We can identify these fake plugins, clean your index.php, and secure your website for you—usually within hour
⏱️ Malware regenerating every minute or hour? Hidden cron jobs are the #1 cause. This guide covers exactly how to find and kill them. If you’d rather have a security expert do this for you with same-day turnaround, see my WordPress malware removal service.
You delete the infected file. Five minutes later, it’s back. You delete it again. Hours later, the same malware reappears with a different filename. Your site is being reinfected automatically — and the most common cause is a malicious cron job.
A cron job is just a scheduled task on your server. Legitimate sites use them all the time (running backups, sending scheduled emails, clearing caches). But attackers also use them as their insurance policy against your cleanup attempts. They install a hidden cron job that re-downloads or re-creates the malware automatically — every minute, every hour, every day — for as long as it stays on your server.
After cleaning 4,500+ hacked WordPress sites, I find malicious cron jobs are responsible for the majority of “malware keeps coming back” cases. This guide walks through exactly how to find and kill them, whether you’re on cPanel, a VPS, or managed hosting.
📋 Quick Removal Process
cPanel: Cron Jobs section → look for eval, base64_decode, gzinflate → Delete
VPS/SSH: Run crontab -l for your user, then check other users (root, www-data, apache)
WordPress: Install WP Crontrol plugin → audit all scheduled events for unfamiliar hooks
After removal: Clean infected files, change ALL passwords, reset wp-config salts
What Is a Cron Job and How Hackers Abuse It
A cron job is a task your server runs automatically on a schedule. Every modern web server supports cron — it’s built into Linux/Unix and exposed through tools like cPanel’s Cron Jobs section.
Legitimate examples on a WordPress site:
UpdraftPlus running daily backups at 3 AM
WordPress core checking for plugin updates
Caching plugins clearing expired cache files
SEO plugins regenerating sitemaps
Email plugins sending newsletters at scheduled times
The cron syntax looks like this:
* * * * * /path/to/command
The five asterisks represent minute, hour, day-of-month, month, day-of-week. Five asterisks means “run every minute of every hour of every day forever.” That extreme frequency is exactly what attackers want — instant reinfection the moment you clean their malware.
How a Malicious Cron Job Gets There in the First Place
Attackers can’t just add a cron job to a server they don’t have access to. The cron job is never the first step of a hack — it’s added after the attacker has already gained some access. The typical infection sequence:
Initial breach — Attacker exploits an outdated plugin, weak password, vulnerable theme, or compromised credentials to get into the site
Backdoor upload — They upload a webshell — often disguised with an innocent name like wp-check.php, cache.php, or hidden inside /wp-includes/. This webshell gives them ongoing command-line access to your server
Cron job installation — Through the webshell, they execute the command needed to install a cron job. The cron job becomes their persistence mechanism
Payload execution — The cron job runs on schedule, re-downloading malware from a remote URL, recreating backdoor files, or restoring spam content
This is why standard cleanup fails so often. You find and delete one backdoor, feeling like you’ve solved it. But the cron job is sitting silently in the background, ready to re-download a fresh copy of the malware the moment your cleanup is complete.
[Screenshot: cPanel Cron Jobs interface showing the malicious entry highlighted]
Let’s break down what makes this dangerous and how to spot variants:
The Three Layers of Obfuscation
Attackers use three layers to hide the actual malicious code from casual inspection and from basic security scanners:
Layer
Function
What It Does
1. Base64 Encoding
base64_decode()
Makes malicious code look like random text characters
2. Compression
gzinflate()
Compresses the encoded data, hiding it further from signature scanners
3. Code Execution
eval()
Tells PHP to execute the decoded, decompressed code as if it were normal PHP
The combination eval(gzinflate(base64_decode(...))) is the classic “PHP malware obfuscation triple play.” If you see this pattern anywhere on your server — in cron jobs, in PHP files, in database options — it’s almost certainly malicious.
The Schedule: * * * * *
That five-asterisk schedule means “run every minute”. Attackers use this aggressive timing because it ensures the malware reappears almost instantly after you delete it. By the time you finish cleaning a file, the cron job has already restored it.
Other schedules to recognize:
*/5 * * * * — every 5 minutes
0 * * * * — every hour at minute 0
0 */6 * * * — every 6 hours
0 3 * * * — every day at 3 AM (when traffic is low)
Common Variants You’ll See
Attackers vary the pattern, but the core obfuscation stays similar:
Any cron job that downloads from an external URL, executes encoded data, or runs from suspicious paths inside your WordPress installation should be considered malicious until proven otherwise.
Method 1: Find and Remove Malicious Cron Jobs in cPanel
cPanel hosts (most shared hosting — Bluehost, HostGator, GoDaddy cPanel plans, SiteGround, etc.) make this relatively straightforward.
Step-by-Step cPanel Removal
Log in to your cPanel account
Scroll to the Advanced section (sometimes called “Tools”)
Click Cron Jobs
Scroll to the Current Cron Jobs table at the bottom of the page
Examine every entry carefully. Look for any of these red flags:
Commands downloading from external URLs (wget http://..., curl http://...)
Commands you don’t recognize and didn’t create
Commands running every minute (* * * * *) — almost always malicious unless you specifically set up a high-frequency monitor
Commands pointing to suspicious paths inside /wp-content/
Commands with extremely long obfuscated arguments
Click the Delete button next to each malicious entry
Confirm deletion when prompted
What Legitimate Cron Jobs Look Like
For comparison, legitimate cron jobs are usually clear and readable:
# WordPress real cron (sometimes set up to replace WP-Cron)
*/5 * * * * /usr/bin/php /home/username/public_html/wp-cron.php

# UpdraftPlus or backup plugin
0 3 * * * /home/username/public_html/wp-content/plugins/updraftplus/cron.php

# Plain WordPress wp-cron via wget
*/15 * * * * wget -q -O - https://yourdomain.com/wp-cron.php?doing_wp_cron >/dev/null 2>&1
The key distinction: legitimate cron jobs reference clear, readable file paths within your own site. Malicious ones use obfuscated commands or external URLs.
Method 2: Find Malicious Cron Jobs via SSH (VPS, Cloud, Dedicated)
If you’re on a VPS, cloud server, or dedicated host, you’ll need terminal access via SSH. This method is also more thorough because you can check cron jobs for multiple users — something cPanel doesn’t show.
Check Your User’s Cron Jobs
Connect to your server via SSH using your terminal or a tool like PuTTY
Run this command to list your current user’s cron jobs:
Review the output carefully for the same red flags from Method 1.
Edit and Remove Malicious Entries
If you find malicious entries, edit your crontab to remove them:
crontab -e
This opens your crontab in a text editor (usually nano or vi). Use arrow keys to navigate to the malicious line, delete the entire line, then save:
nano: Ctrl+O to save, Enter to confirm, Ctrl+X to exit
vi/vim: Press i to enter edit mode, delete the line, press Escape, type :wq to save and exit
The Critical Step Most People Miss: Check Other Users
Sophisticated attackers often hide cron jobs under different system users — not your main user account. The web server user (www-data, apache, or nginx) is a common hiding spot because that’s the user PHP runs as.
Run these commands (requires sudo/root access):
# Check root's cron jobs
sudo crontab -l

# Check the web server user's cron jobs (varies by OS)
sudo crontab -u www-data -l    # Debian/Ubuntu
sudo crontab -u apache -l      # CentOS/RHEL
sudo crontab -u nginx -l       # Nginx-based systems

# List ALL users with cron jobs on the system
sudo ls -la /var/spool/cron/crontabs/    # Ubuntu/Debian
sudo ls -la /var/spool/cron/             # CentOS/RHEL

# Check system-wide cron files
sudo cat /etc/crontab
sudo ls -la /etc/cron.d/
sudo ls -la /etc/cron.hourly/ /etc/cron.daily/ /etc/cron.weekly/ /etc/cron.monthly/
Examine each location for suspicious entries. Attackers sometimes drop cron files into /etc/cron.d/ with innocent-looking names like php-update or wp-cache-clear.
WordPress has its own internal scheduler called WP-Cron. Unlike server-level cron jobs, WP-Cron events are stored in your WordPress database and run when someone visits your site. Attackers can hijack WP-Cron just as easily as server cron.
Inspect WP-Cron with WP Crontrol Plugin
Install the free WP Crontrol plugin from WordPress.org
Activate it
Go to Tools → Cron Events
Review every scheduled event listed
What to look for:
Hooks with random names — Something like wp_xyz_update or hex-string hooks like _0x4a2b
Hooks pointing to functions you don’t recognize — Especially in unfamiliar plugin files
Events with extremely high frequency — Multiple times per hour for tasks that shouldn’t be that frequent
Hooks from plugins you’ve already deleted — Sometimes orphaned cron events keep running malicious code
Check WP-Cron via WP-CLI (Advanced)
If you have WP-CLI access, this is faster:
# List all scheduled cron events
wp cron event list

# List all registered cron hooks
wp cron schedule list

# Delete a suspicious cron event
wp cron event delete suspicious_hook_name
Check WP-Cron Directly in the Database
WP-Cron data is stored in wp_options as a serialized array under the option name cron. In phpMyAdmin:
Open your database
Browse the wp_options table
Search for option_name = cron
Examine the option_value for unfamiliar function names or suspicious URLs
What to Do Immediately After Removing the Cron Job
Deleting the malicious cron job stops the reinfection from happening. But the site is still infected — the cron job was just preventing your previous cleanups from sticking. Now the cleanup will actually hold.
Generate new salts at api.wordpress.org/secret-key/1.1/salt and replace the matching values in wp-config.php. This invalidates all active sessions, including any hacker sessions.
Step 6: Update Everything
WordPress core, every plugin, every theme. Remove unused plugins and themes. The original entry point was probably an outdated component — patching is essential.
Most site owners don’t know to look for it. They focus on PHP files and ignore the cron tab entirely. Even most security plugins don’t actively monitor cron job changes.
Modifying cron is easy with shell access. Once an attacker has any code execution on your server, adding a cron job is a single command. It’s the lowest-effort persistence mechanism available.
Cron jobs survive most cleanups. Even thorough file cleanups and database scrubs miss cron because cron lives in a different system entirely (the OS-level scheduler, not WordPress files or the database).
This is why malicious cron jobs cause more reinfections than any other persistence mechanism in my experience. If WordPress malware keeps coming back, cron is always my first check.
For other reinfection causes (hidden admin users, ghost plugins, database malware, sibling site infections), see my master guide on why WordPress malware keeps coming back.
Real Case: How Cron Jobs Sustained 12,000 Spam Posts
One of the most dramatic cron job cases I’ve worked on: a client’s WordPress site had been compromised for months. Every time they cleaned up the spam casino posts (sometimes thousands at a time), they’d reappear within 24 hours. Wordfence reported the site clean. The hosting provider couldn’t find the issue.
The culprit: a malicious cron job running every hour, calling a remote URL that returned fresh batches of casino spam content. Removing the cron job — combined with cleaning the existing spam — finally stopped the cycle.
How do I know if my WordPress malware is from a cron job?
The biggest tell is timing. If malware reappears at predictable intervals — every minute, every hour, every day at the same time — it’s almost certainly a scheduled task. Cron-based reinfection is also faster than other reinfection types: the malware comes back within minutes of deletion, not days. If reinfection happens unpredictably, it’s more likely a backdoor file or hidden admin user.
Where do hackers usually hide cron jobs?
The most common locations: cPanel Cron Jobs section (most shared hosting), the system-level crontab via crontab -e (your user), the web server user’s crontab via sudo crontab -u www-data -l, system-wide cron files in /etc/cron.d/, and WordPress’s internal WP-Cron stored in the wp_options database table. Sophisticated attacks may use multiple locations simultaneously.
Can security plugins detect malicious cron jobs?
Generally no. Most WordPress security plugins (Wordfence, Sucuri, MalCare) scan files and database content but don’t inspect server-level cron jobs. Some monitor WP-Cron events for unfamiliar hooks, but most don’t actively flag suspicious cron entries. This is why manual cron auditing is essential when malware keeps coming back.
Will deleting the cron job fix my hacked site completely?
No — it stops the reinfection cycle but doesn’t remove existing malware. After deleting the cron job, you still need to scan for and remove infected files, find the original backdoor that allowed cron installation, change all passwords, and update your software. The cron job removal is one critical step in a larger cleanup process.
What does eval(gzinflate(base64_decode())) mean in a cron command?
It’s a three-layer obfuscation pattern. base64_decode converts encoded text back to binary data, gzinflate decompresses that data, and eval executes the decompressed code as PHP. This combination is almost exclusively used by malware to hide malicious code from inspection. If you see this pattern in a cron job (or anywhere else on your server), assume it’s malicious.
Can I just disable WP-Cron entirely to prevent this?
You can disable WP-Cron by adding define('DISABLE_WP_CRON', true); to wp-config.php, then setting up a real server cron job to call wp-cron.php. This actually improves performance and security because legitimate WordPress tasks run more reliably. However, it doesn’t prevent server-level cron job attacks — those happen through the OS scheduler, not WordPress.
How do attackers add cron jobs without my knowledge?
They don’t add cron jobs as the first step — that requires existing access. The sequence is: (1) attacker exploits a vulnerability or steals credentials to get initial access, (2) uploads a backdoor file (webshell), (3) uses the webshell to execute the cron-installation command. The cron job is their persistence layer, not their entry point. Find and patch the original entry point or they’ll just re-add the cron later.
What if I can’t find any malicious cron jobs but malware still keeps coming back?
If cron is clean, the persistence mechanism is one of the other 7 causes I cover in my comprehensive reinfection guide — backdoor files, hidden admin users, modified core files, database injections, infected sibling sites on the same hosting account, unrotated credentials, or unpatched original vulnerabilities. Work through each systematically.
Will my hosting provider help find malicious cron jobs?
Most shared hosts (Bluehost, GoDaddy, HostGator) won’t actively investigate cron jobs for you, but they will give you cPanel access to inspect them yourself. Some managed hosts (Kinsta, WP Engine) handle cron at the platform level and may block obvious malicious entries. For comprehensive cleanup, you usually need security expertise that goes beyond standard hosting support.
Get Help Removing Cron Job Malware
Cron job malware is technically simple to remove once you know what to look for, but finding all the persistence layers (cron job + backdoors + original entry point) is what makes a cleanup actually stick. If you’ve identified a malicious cron job but can’t find the backdoor that installed it, or if removing the cron job doesn’t stop reinfection, you’re missing something deeper.
This is exactly the type of investigation I run on every paid cleanup. I work through cron jobs first (server-level and WP-Cron), find every backdoor that could re-install cron, identify and patch the original entry point, and harden against future cron-based attacks.
Stop the cron-based reinfection cycle
Get the cron job removed, the backdoor found, and the entry point patched.
About the author: Md Pabel is a WordPress security specialist with 7+ years of experience. He has personally cleaned over 4,500 hacked WordPress sites and specializes in finding persistence mechanisms that defeat standard cleanup attempts. Real-world malware analysis at mdpabel.com.
Quick answer: Hidden links malware in WordPress is most often a remote-fetch backdoor — a tiny PHP snippet (usually inside footer.php) that pulls a list of casino, slot, pharma, or counterfeit links from an attacker-controlled server on every page load and prints them inside an off-screen <div>. Visitors don’t see the links; Googlebot does. To remove it: back up, delete the fetcher snippet from your theme, scan files + database for related backdoors, rotate all credentials, and request a Search Console review.
Key takeaways
What it is: A black-hat SEO injection that adds invisible casino/slot/pharma backlinks to your site to pass authority to attacker-owned domains.
The new pattern (2025): Most cleanups I’m doing this year aren’t hard-coded link blocks — they’re remote-fetch backdoors that download fresh spam HTML from a C2 server every request, so the visible spam changes daily.
Where it hides:footer.php in 80% of my cases, then header.php, functions.php, and the database (wp_options, wp_posts).
How it stays hidden: Off-screen CSS like position:absolute; left:-989999999999px; — never display:none, because some search crawlers ignore that.
Why it survives “cleanups”: The fetcher is small (10–30 lines). Site owners delete the visible spam list in HTML but miss the snippet that re-pulls it.
This case: Found in footer.php, fetching from an Indonesian C2 domain that itself is a compromised legitimate site.
What is hidden links malware (and why “remote-fetch” matters)
Hidden links malware — sometimes called link injection spam, SEO spam injection, or spamdexing — is malicious code that adds invisible outbound links to your WordPress pages. The attacker’s goal is simple: borrow your domain authority to rank their spam pages (casino, slot, pharma, replica goods, adult content) in Google.
What changed in the last 18 months is the delivery mechanism. Older infections hard-coded a block of spam HTML directly into footer.php. That’s easy to find with a simple grep. Newer infections — including the one I’m walking through here — use a remote-fetch backdoor: a tiny PHP function that downloads the spam list from a remote URL on every page load.
This matters for three reasons:
The visible spam rotates. The attacker can swap target keywords from “viagra cheap” to “slot gacor” to “mahjong ways” without re-hacking your site.
Static malware scanners miss it. The local fingerprint is just a generic file_get_contents() call — not a known signature.
“Cleaning” the visible HTML doesn’t fix anything. If you only delete the rendered links and leave the fetcher, the spam comes back on the next page load.
I separated this out from my WordPress pharma hack guide and my Japanese keyword hack guide because the remote-fetch family behaves differently — and ignoring that difference is the #1 reason cleanups fail and the spam returns within days.
The case: a remote-fetch backdoor in footer.php
The infected site I’ll reference here was a small B2B WordPress installation. The owner only noticed because Google Search Console flagged “Security Issues — URLs containing user-generated spam” and a site:domain.com slot query returned roughly 600 indexed gambling pages that didn’t exist on the actual site.
The spam wasn’t in the database. It wasn’t in wp-content/uploads. There were no rogue admin users. The site’s own pages, when viewed in a browser, looked completely fine. But viewing the page source revealed a giant block of casino and slot anchor tags wedged just before the closing </body> tag — and that block was different on every refresh.
Walking back from the rendered HTML to the template, the trail led to wp-content/themes/[active-theme]/footer.php. At the bottom of the file, just above wp_footer(), sat this:
That’s it. Twenty-five lines. No obfuscation. No base64_decode, no eval, no gzinflate — the things most malware scanners look for. Just three legitimate ways to make an outbound HTTP request, with the response echoed straight into the page.
What this fetcher actually does
Tries file_get_contents first — works on most shared hosts where allow_url_fopen is on.
Falls back to cURL — covers hosts where fopen URL wrappers are disabled.
Falls back to a stream context — covers edge cases where neither of the first two works.
Spoofs a Mozilla User-Agent so the C2 server treats it as a normal browser, not a script.
Suppresses errors with @ so a temporarily-unreachable C2 server never breaks the page.
Echoes the response unconditionally — whatever the attacker sends, your site prints.
The C2 endpoint (in this case nawalaku[.]my[.]id/bl/) returns an HTML block containing 50–200 gambling and slot anchor tags wrapped in an off-screen <div>:
That CSS pushes the content roughly a trillion pixels to the left of the viewport. A human will never scroll that far. Googlebot reads the DOM, doesn’t care about visual position, and indexes every link.
Casino & slot spam vs. pharma vs. Japanese keyword hack
If you’ve read about WordPress SEO spam before, you’ve probably seen guides on the pharma hack or the Japanese keyword hack. They’re related but not identical — and treating them as the same thing is why cleanups fail.
Variant
What it injects
Typical entry point
Hiding technique
Casino / slot spam (this article)
Gambling, slot, mahjong, judi online links
Theme files (footer.php), remote fetcher
Off-screen CSS, dynamic remote payload
Pharma hack
Viagra, Cialis, weight-loss pill links
Conditional cloaking in functions.php + DB wp_options
User-agent cloaking (only shows to Googlebot)
Japanese keyword hack
Japanese-character spam pages
Rogue .html/.php files in random subdirectories
Generates thousands of new indexable URLs
Casino spam is the variant exploding fastest right now. It’s the one I get the most cleanup requests for in 2025–2026, partly because the spam network behind it is huge and partly because the remote-fetch delivery makes it survive routine scans.
If you see indexed pages for keywords your site shouldn’t rank for — especially with Indonesian or Vietnamese language fragments — you have an injection. Also try site:yourdomain.com viagra and site:yourdomain.com 賭場 to rule out parallel pharma or Chinese-keyword infections.
2. View-source for off-screen blocks
Open your homepage, right-click → View Page Source (not “Inspect” — the rendered DOM can hide things), and Ctrl+F for these strings:
position:absolute
left:-9 (covers -9999px, -989999999999px, etc.)
text-indent:-9999
visibility:hidden
display:none followed by <a> tags
font-size:0
color:white or color:#fff next to anchor tags
Any of these next to a block of anchor tags is the smoking gun.
3. Search Console & security headers
In Search Console, check Security Issues and Manual Actions. Also pull up Performance → Search Results, set the date range to the last 28 days, and sort by Clicks. If you see queries you’ve never targeted (especially gambling-related), the malware has been there long enough to attract impressions.
For free third-party verification, run Sucuri SiteCheck — it’ll flag the off-screen div pattern and any blacklist hits.
How to remove the remote-fetch backdoor (step by step)
Order matters here. Don’t skip steps — especially the credential rotation. I’ve cleaned a lot of sites where the owner removed the visible code, didn’t change passwords, and got reinfected within 24 hours through the same compromised hosting account.
Step 1 — Full backup first
Even on an infected site, take a fresh files-and-database backup before touching anything. If you break something during cleanup you’ll want a restore point. Use UpdraftPlus or All-in-One WP Migration; download the backup off-server.
Step 2 — Enable maintenance mode
You don’t want visitors hitting the spam during cleanup. Drop a .maintenance file in the WordPress root or use a maintenance plugin briefly.
Open every match. A legitimate theme almost never makes outbound HTTP requests from footer.php, header.php, or functions.php. If you see those functions in those files, that’s your fetcher. Delete the entire snippet.
Then check these specific files in order of frequency:
footer.php — my #1 finding (this case)
header.php
functions.php — look for add_action('wp_footer', ...) or add_action('wp_head', ...) hooked to suspicious functions
Any .php file in wp-content/uploads/ — should never exist
Step 4 — Hunt the secondary backdoor
Here’s the part most DIY cleanups miss: the fetcher is rarely the only thing the attacker left behind. Whoever uploaded that snippet had write access to your filesystem — meaning they almost certainly planted a re-entry backdoor too.
Look for:
Recently modified files in the last 30 days: find . -type f -name "*.php" -mtime -30
Files with names mimicking core: wp-cache.php, wp-tmp.php, class-wp-config.php (any wp-* file in the wrong directory)
PHP files in wp-content/uploads, wp-content/upgrade, or anywhere outside themes/plugins
Suspicious functions.php hooks calling eval, assert, create_function, preg_replace with the /e modifier
Even though the spam in this case was rendered from a remote source, attackers often leave a parallel injection in the DB so they have two paths in. Run these queries via phpMyAdmin or WP-CLI:
SELECT * FROM wp_options WHERE option_value LIKE '%position:absolute%';
SELECT * FROM wp_options WHERE option_value LIKE '%file_get_contents%';
SELECT * FROM wp_posts WHERE post_content LIKE '%left:-9%';
SELECT * FROM wp_users WHERE user_registered > '2024-01-01';
Any unfamiliar admin users get deleted. Any rows containing off-screen CSS get cleaned manually.
Step 6 — Update everything, rotate everything
WordPress core, all plugins, all themes
Delete unused/inactive plugins and themes (every inactive plugin is still attack surface)
Replace any nulled plugins with legitimate copies — nulled software is the entry point in roughly 60% of the cases I see (why nulled plugins are dangerous)
Rotate: WordPress admin passwords, hosting cPanel password, FTP/SFTP passwords, database password, API keys, and the WordPress salts in wp-config.php
Force-logout all sessions (Users → All Users → Log Out Everywhere Else for each admin)
Enable 2FA on every admin account
Step 7 — Clean the search index
Even after the malware is gone, Google will keep showing the spam pages until it re-crawls. Speed that up:
In Search Console, submit a fresh sitemap.
Use the URL Inspection Tool to request reindexing of your most important pages.
For spam URLs that point to pages that don’t exist on your site, use the Removals tool to temporarily hide them.
If you have a manual action, request a review and explain in 2–3 sentences exactly what you removed.
The single most-asked question after a cleanup is “why did this happen?” Honest answer from 4,500+ cleanups: it’s almost always one of four things — outdated software, nulled plugins, weak admin passwords, or a compromised shared-hosting neighbor. Fixing those four covers most reinfection cases.
Block PHP execution in uploads. Add this to wp-content/uploads/.htaccess:
<Files *.php>
    deny from all
</Files>
Disable file editing from wp-admin. Even if an attacker gets a low-level admin login, they can’t edit theme files in the dashboard:
Force HTTPS-only admin and 2FA on all admin accounts. Wordfence, MiniOrange, or Solid Security all do this in two clicks.
File integrity monitoring. Wordfence sends you an email any time a core or theme file changes. With remote-fetch malware, this is the fastest detection method — the moment footer.php changes outside of an update, you get a warning.
Weekly five-minute audit. Every Monday, run site:yourdomain.com slot, site:yourdomain.com viagra, and site:yourdomain.com 賭場 in Google. If they return zero results, you’re clean. This is the cheapest early-warning system that exists. More on long-term defense in why WordPress malware keeps coming back.
The infrastructure behind casino spam (brief threat intel)
The C2 domain in this incident (nawalaku[.]my[.]id) is part of a larger Indonesian gambling-affiliate spam network. According to multiple Indonesian government and security sources, this network has compromised hundreds of legitimate .go.id (government), .ac.id (academic), and .mil.id (military) domains in Indonesia, plus thousands of small WordPress sites globally that act as either content hosts or remote-fetch nodes. Indonesian authorities reported handling 683 such compromised institutional domains by late 2023, with the count rising into the millions of indexed spam pages by 2024.
What this means for you: if your remote-fetch URL points to a .my.id, .go.id, .ac.id, .id, or generic-looking Indonesian domain, you’re looking at the same family. The fix above works for all variants — only the C2 URL changes.
FAQs
Is this the same as the pharma hack?
No. The pharma hack typically uses cloaking (showing different content to Googlebot vs. real users) and lives in wp_options or modified plugin files. Casino/slot spam in 2025 uses remote-fetch delivery from footer.php and shows the same off-screen content to everyone — bots and humans alike, with humans just not seeing it visually.
I deleted the spam links in the rendered HTML, but they came back. Why?
Because you deleted the output, not the source. The fetcher inside footer.php regenerates the spam list on every page load. You have to find and delete the PHP snippet, not the HTML it prints.
Will my Google rankings recover?
Usually, yes — but not instantly. Once the malware is gone and you’ve requested reindexing, expect 2–6 weeks for Google to drop the spam pages and partially restore your rankings. Sites that had a manual action take longer because a human reviewer has to approve the reconsideration request. I documented one such recovery in recovering from SEO spam: 242,000 spam pages cleared.
Can a free Wordfence scan find this?
Sometimes. Wordfence’s signature database catches the most common remote-fetch patterns, but a custom variant with an unfamiliar C2 URL can slip through. The view-source check (Step 2 above) is more reliable than any single scanner.
Do I have to switch hosts?
Not necessarily. But if your hosting account is on shared hosting and you’ve been hacked twice on the same plan, the entry point may be a neighbor on the same server, not your site. In that case, moving to a hardened managed-WordPress host (SiteGround, Kinsta, WP Engine) is the single biggest reinfection-prevention step you can take. My breakdown is in my SiteGround review after 4,500 cleanups.
What if I find the same fetcher in functions.php, not footer.php?
Same removal process — just be more careful. functions.php often legitimately contains hooks and filters, so don’t bulk-delete the file. Open it, find the snippet that calls file_get_contents or curl_exec to a non-WordPress domain, and delete only that block.
Post-cleanup checklist
Once the fetcher is removed and credentials rotated, walk through my post-cleanup checklist from real cleanups — it covers the things people typically forget (transients, wp-cron, abandoned hosting accounts, leaked API keys) that cause the same site to get reinfected three weeks later.
Conclusion
Hidden links malware in 2025–2026 isn’t the same problem it was three years ago. The hard-coded link blocks that older guides describe are now the minority of cases. What I’m cleaning today is overwhelmingly the remote-fetch backdoor family — small, signature-light PHP snippets in footer.php that pull casino, slot, and gambling spam from external C2 servers on every page load.
The cleanup is straightforward once you know what you’re looking for: find the fetcher, kill it, hunt the secondary backdoor, rotate every credential, harden the entry points, and request reindexing. The hard part is being thorough enough that the site stays clean — and that’s where most DIY cleanups fall short.
Need it cleaned today? I’ve removed this exact malware family from hundreds of sites. WordPress malware removal — same-day turnaround, fixed price, with a 30-day reinfection guarantee. If you’re already on a Google blacklist, see my Google blacklist removal service. Or just hire me directly and we’ll get on a call.
The getfix.win/jsrepo malware is a JavaScript injection that redirects your visitors to spam sites. It hides in your theme’s functions.php file using “Hex Encoding” to look like random numbers.
How to Remove It:
Locate: Open functions.php and look for a line starting with $url = "\x68\x74...".
Delete: Remove that specific line of code.
Scan: Run a Wordfence scan to find any other hidden backdoors.
Update: Update all plugins immediately, as this hack usually enters via outdated software.
If your website keeps redirecting to hxxps:, it has been hit by a specific type of WordPress malware. This hack is currently targeting thousands of sites, messing up SEO, and scaring away visitors.
I recently worked on a client’s site and found this exact malware hiding in their theme’s functions.php file. In this guide, I will show you exactly what this code looks like, how to decode it, and how to clean it up permanently.
What Is the Getfix.win Redirect Malware?
The getfix.win/jsrepo redirect hack sneaks code into your WordPress files. It makes visitors’ browsers fetch a malicious script from getfix.win, which then redirects them to junk sites, gambling ads, or tech support scams.
The Sneaky Part: This malware often targets visitors, not admins. If you are logged in as an Administrator, you might not see the redirect at all. This tricks you into thinking your site is fine while your customers are being sent to spam sites.
Breaking Down the Malicious Code (Developer Analysis)
The malware uses clever tricks to hide itself. I decoded the exact script I found on my client’s site so you know what to look for.
1. The PHP Injection (functions.php)
In the functions.php file (see screenshot below), the hacker injects a line of code that looks like this:
$url = "" . time() . '_' . rand(1000, 9999);
This is called Hex Encoding. The hacker converts text into hexadecimal numbers (e.g., \x68 = h) so security scanners don’t see the word “getfix.win”.
Decoded, that line actually says:
$url = "https:?rnd=[Time]_[RandomNumber]";
Why the random numbers?
The code adds ?rnd=1730700000_1234 to the end of the URL. This trick forces the browser to download a fresh copy of the virus every time, bypassing any caching plugins or firewalls you might have.
2. The JavaScript Injection
Once the PHP code runs, it injects a JavaScript snippet into your site’s header:
<script>
;!function t(){var e="https:?rnd="+Math.random()+"&ts="+Date.now();
// ... code that fetches the virus ...
</script>
This script connects to the hacker’s server and downloads the actual “Payload”—the code that redirects your users.
How to Remove the Malware (Step-by-Step)
Removing this specific infection is straightforward if you follow these steps carefully.
Step 1: Check your functions.php file
Log into your hosting via FTP or File Manager.
Navigate to wp-content/themes/your-active-theme/.
Open the functions.php file.
Look for the code starting with $url = "\x68... or similar hex characters.
Delete that entire code block.
Note: Sometimes this code is also hidden in header.php or footer.php. Check those too.
Step 2: Run a Deep Scan
Deleting the line stops the redirect, but you need to find the “Backdoor” the hacker used to get in. Install Wordfence or MalCare and run a full scan to find hidden files.
Step 3: Update Everything
This specific malware usually spreads through outdated plugins or “nulled” (pirated) themes. Update all your plugins immediately. If you are using a nulled theme, delete it—it is the source of the infection.
Prevention: How to Stop It From Coming Back
Once you are clean, lock the door:
Change Passwords: Change your WP Admin, FTP, and Database passwords immediately.
Disable File Editing: Add define('DISALLOW_FILE_EDIT', true); to your wp-config.php file. This stops hackers from editing your functions.php file from the dashboard.
Install a Firewall: Use the free version of Wordfence or Cloudflare to block bad bots.
Need Help?
If you are uncomfortable editing PHP files or if the redirect keeps coming back after you delete it, you might have a deeper infection (like a hidden database backdoor).
I offer a professional WordPress Malware Removal Service. I will manually clean your files, remove the backdoors, and secure your site against future attacks.
Quick answer: “WP Compatibility Patch” (file path wp-content/plugins/wp-compat/wp-compat.php) is not a real plugin. It is a WordPress backdoor that secretly creates a hidden administrator named adminbackup (adminbackup@wordpress.org) and hides it from your Users screen. To remove it you must delete the plugin folder and the _pre_user_id entry in wp_options, then delete the hidden admin user. Deleting the plugin folder alone lets it regenerate.
If you found a plugin called WP Compatibility Patch in your dashboard, or a folder named wp-compat in your files, your WordPress site has been compromised. The plugin claims to fix compatibility problems between WordPress and PHP. It does nothing of the sort. Its only job is to keep a hidden administrator account alive so an attacker can return whenever they want.
This is not a theoretical risk. The fake plugin was publicly documented by security researchers in July 2025, and I have removed this exact backdoor from client sites during cleanups. Below is everything you need to identify it, confirm the infection, and remove it for good — including the parts that survive a normal cleanup.
WP Compatibility Patch (wp-compat.php): indicators of compromise
If any of the following appear on your site, treat it as a confirmed infection. These are the fingerprints of the wp-compat backdoor:
Indicator
Value
Plugin name (fake)
WP Compatibility Patch
Folder / file
/wp-content/plugins/wp-compat/wp-compat.php
Fake author
WP Core Contributors
Fake description
“Fixes minor compatibility issues with the latest WordPress and PHP versions”
Randomized per infection (different on every site)
Database persistence
_pre_user_id option in the wp_options table
Bootstrap function
wpc_patch_bootstrap()
Cloaking hook
pre_user_query (removes the hidden ID from the user list)
Attacker probe cookie
WORDPRESS_ADMIN_USER
Type
Fake plugin / persistent administrator backdoor
Severity
Critical — full site compromise
First publicly documented
July 2025
What is WP Compatibility Patch, and how does it work?
The wp-compat plugin is malware that disguises itself as official WordPress tooling. It borrows a believable name and the author label “WP Core Contributors” so that a quick glance at your plugins list reads as harmless maintenance code. There is no such plugin in the official WordPress.org repository.
Once an attacker uploads it, the plugin runs a small routine (the wpc_patch_bootstrap function) on every page load. That single function is what makes this backdoor so persistent and so hard to spot.
It creates a hidden administrator on every page load
The plugin checks whether an administrator named adminbackup exists. If it does not, it recreates the account using WordPress’s own wp_insert_user() function, assigns the administrator role, and sets the email to adminbackup@wordpress.org. Because the check fires on every request, deleting the user from your dashboard does nothing — the next visitor to your homepage brings it straight back.
It hides the account from you
After creating the admin, the plugin hooks into pre_user_query — the filter WordPress runs before listing users — and rewrites the SQL so the hidden account is excluded from the results. The effect is unsettling: your Users screen looks normal, the total user count is adjusted down by one to match, and if you somehow locate the account and try to delete it, WordPress returns “Invalid user ID.” The plugin also strips itself from the plugins list, so it can be active while appearing absent.
It survives password resets and re-scans
The attacker’s user ID is stored in the database as a _pre_user_id entry in the wp_options table. That single row is the anchor for the whole backdoor. Changing every password, deleting suspicious files, and running a security scan will not dislodge it, because the plugin keeps reading that ID to rebuild and re-hide the account. This is why so many owners “clean” the site and find the backdoor again within hours.
A built-in way for the attacker to check on it
The malware also watches for a special request cookie named WORDPRESS_ADMIN_USER. When it sees that cookie, it confirms the backdoor is still alive. This lets the attacker probe hundreds of infected sites quickly without ever logging in.
The same payload also hides inside functions.php
The wp-compat plugin is the standalone form of this backdoor, but the identical adminbackup payload is frequently injected directly into a theme’s functions.php instead of shipping as a separate plugin. The behaviour is the same — hidden admin, _pre_user_id, user-list cloaking — but there is no plugin folder to find. If you do not see a wp-compat folder but the symptoms match, read my breakdown of the functions.php variant of the adminbackup hidden-admin hack, which walks through removing the cloaking code first so the account becomes visible.
How to find wp-compat and the adminbackup admin on your site
Because the account is cloaked inside the WordPress admin interface, the dashboard is the worst place to look. The cloaking hook only fires in an admin context, so the most reliable checks bypass the interface entirely — via SSH, WP-CLI, or direct database queries.
In phpMyAdmin or the MySQL CLI, look for the persistence row and the hidden user (adjust the wp_ prefix to match your install):
SELECT * FROM wp_options WHERE option_name = '_pre_user_id';

SELECT ID, user_login, user_email, user_registered
FROM wp_users
WHERE user_login = 'adminbackup'
   OR user_email LIKE '%@wordpress.org';
3. Check users the right way (with WP-CLI)
Because WP-CLI runs outside the admin context, the cloaking hook does not apply — so a CLI listing reveals the account the dashboard hides:
wp user list --role=administrator --fields=ID,user_login,user_email
wp option get _pre_user_id
If wp user list shows an adminbackup account that never appears in wp-admin, you have positively confirmed the infection.
Related fake-plugin and hidden-admin variants
The wp-compat backdoor is one product of an organized campaign that ships interchangeable fake plugins. If you found wp-compat, scan for these siblings too, because the same actor often drops more than one:
DebugMaster Pro, wp-performance-booster.php, and WP-antymalwary-bot.php — fake maintenance/optimization plugins
WP-Security (claims the “WordPress Security Team” as author) and fake “Classic” or LiteSpeed Cacher clones
Order matters here. Remove the database anchor and the user first, then the files — otherwise the plugin recreates the account between steps.
Take a forensic backup of files and database first, so you can investigate the entry point later (not to restore the infection).
Delete the persistence row:DELETE FROM wp_options WHERE option_name = '_pre_user_id'; (or wp option delete _pre_user_id).
Delete the hidden admin by ID via WP-CLI (wp user delete <ID>) or by removing its rows from wp_users and wp_usermeta.
Delete the plugin folder/wp-content/plugins/wp-compat/ entirely, plus any sibling fake plugins you found.
Find how it got in. Inspect wp-config.php, the mu-plugins folder, /uploads/, theme functions.php, and recently modified files. A standalone fake plugin almost always means a dropper or a compromised credential exists somewhere else.
Rotate every credential: all admin users, database, FTP/SFTP, hosting panel, and the secret keys/salts in wp-config.php.
If you only delete the folder and skip the database row, the backdoor comes back — this is the single most common reason a cleanup fails. I explain the mechanics of that in why WordPress malware keeps coming back. For the complete, step-by-step infection cleanup, follow my WordPress malware removal process.
How the plugin got onto your site — and how to keep it out
The wp-compat plugin cannot install itself; an attacker uploads it after gaining access. In the cleanups I have done, the entry point is almost always one of three things: a weak or reused administrator password, an outdated plugin or theme with a known vulnerability, or stolen FTP/SFTP/hosting credentials. Close those doors and this backdoor has nowhere to come from. At minimum, enforce strong unique passwords with two-factor authentication, keep everything updated, and remove plugins and themes you no longer use. My guide to securing your WordPress login covers the highest-impact hardening steps.
When to bring in help
This backdoor is recoverable on your own if you are comfortable with SSH and SQL. But if the hidden admin keeps returning, if you found multiple fake plugins, or if the site is also showing spam or redirects, that usually means a deeper dropper is still active. I have cleaned more than 4,500 hacked WordPress sites, including persistent, self-regenerating backdoors like this one — see, for example, this case study on a regenerating malware infection. If you would rather have it handled end to end, you can hire me to remove it.
Frequently asked questions
Is “WP Compatibility Patch” a real WordPress plugin?
No. It does not exist in the official WordPress.org plugin repository, and its author label “WP Core Contributors” is fake. It is malware that creates a hidden administrator account and gives an attacker a persistent backdoor into your site.
What is wp-compat.php?
It is the main file of the fake WP Compatibility Patch plugin, found at /wp-content/plugins/wp-compat/wp-compat.php. It creates and conceals an “adminbackup” administrator and stores that account’s ID in the _pre_user_id option so the backdoor survives normal cleanups.
Why does the adminbackup admin user keep coming back after I delete it?
Because the plugin recreates it on every page load and tracks it through the _pre_user_id row in wp_options. You have to remove the plugin files and that database row together, delete the user, then find the entry point. Deleting only one piece guarantees it returns.
Is adminbackup@wordpress.org an official WordPress email address?
No. WordPress.org never creates user accounts on your website. The address is hard-coded by the malware purely to look legitimate. Any administrator using that email is a backdoor and should be removed immediately.
Will Wordfence or Sucuri detect WP Compatibility Patch?
A scan may flag the plugin files, but the hidden user and the _pre_user_id row can survive a basic cleanup because the malware cloaks them inside the dashboard. Always verify removal through WP-CLI or direct SQL, not just by looking at your Users screen.
Last updated: May 31, 2026 by MD Pabel, WordPress Security Specialist — 4,500+ hacked sites cleaned.
Finding your website suddenly redirecting to spammy pages or acting strangely is a horrible feeling. If you’ve dug into your site’s files, you may have been shocked to find that all your JavaScript (.js) files are infected with a large, confusing block of malicious code.
A very common infection looks something like this, often at the very top of the file:
;if(typeof uqvq==="undefined"){function a0M(){var r=['WQhdRSkK','D8keba',...
// ... a very long block of obfuscated code ...
...function G(j,E){var S=P;return j[S(0x219,'j%PW')+S(0x23a,'e@Bi')+'f'](E)!==-(0x19b+-0x116d+0xfd3);}}());};
This specific malware (which we can identify by the if(typeof uqvq==="undefined") check) is designed to redirect your visitors, steal information, or inject more malware.
The good news is that because the exact same code is injected into every file, we can use a powerful code editor like Visual Studio Code (VS Code) to perform a “Find and Replace” across your entire website in one go.
⚠️ Important Disclaimer: This method cleans the symptom (the malicious code) but not the cause (the security vulnerability). Your site is likely to be reinfected quickly if you don’t take further steps. This is an emergency cleanup, not a permanent fix.
If you’re not comfortable doing this yourself, or if you want a professional to find the root cause and harden your site, I offer a comprehensive WordPress Malware Removal Service to get your site clean and secure.
Step-by-Step Guide to Removing the Malware
Follow these steps precisely to clean your files.
Step 1: Backup, Replace Core Files & Get a Local Copy to Clean
Before you make any changes, your first step is to get a complete backup. This is your safety net. After that, we’ll replace the main WordPress files and download your wp-content folder to clean them locally.
⚠️ Take a Full Backup: Log into your hosting control panel (like cPanel, Plesk, or your host’s custom panel) and use the backup tool to generate a full backup of your entire site (both files and the database). Download this backup file to your computer and keep it somewhere safe. Do not skip this step!
Replace WordPress Core Files: First, log in to your server. Following this guide, replace your wp-admin and wp-includes folders with fresh, clean copies from a new WordPress download. Do not delete your wp-content folder and wp-config.php file.
Connect to Your Site: Use an FTP/SFTP client (like FileZilla) or your hosting panel’s (cPanel) File Manager to access your server’s files.
Download Your Files:
For WordPress Sites: Download your entire wp-content directory to a folder on your computer.
For Other Sites (Node.js, etc.): If your site isn’t WordPress, it’s best to download the entire website. To speed this up, use your hosting File Manager to compress the whole site into a .zip file, download that single file, and then uncompress it on your computer.
Step 2: Open Your Website Folder in VS Code
If you don’t have it, download VS Code for free. This tool will let us edit all the files at once.
Open VS Code.
Go to File > Open Folder…
Select the folder you just downloaded (e.g., the wp-content folder or your full site folder). You’ll see your site’s file structure in the “Explorer” panel on the left.
Step 3: Find the Exact Malicious Code
First, we need to get a perfect copy of the malware string.
In the VS Code Explorer, find any infected .js file (e.g., inside wp-content/plugins/.../assets/js/).
Click to open it.
Carefully select the entire block of malicious code. Start from the very first character (often a semicolon ;) right before if(typeof uqvq... and select all the way down to the final }; at the end of the block.
Copy this entire block to your clipboard (Ctrl+C or Cmd+C).
Step 4: Use “Find and Replace in Files”
This is the most critical step.
Click the Search icon in the left-hand sidebar (or press Ctrl+Shift+F on Windows/Linux, Cmd+Shift+F on Mac).
This opens the “Search” panel with two boxes: “Find” and “Replace.”
In the “Find” box: Paste the entire malicious code block you just copied. It will be very long and may wrap around multiple lines. That’s fine.
In the “Replace” box: Leave this completely empty. We want to replace the malware with nothing.
Just above the “Replace” box, make sure the file filter is set to include .js files. You can type *.js into the “files to include” box to be extra sure you’re only targeting JavaScript files.
Double-check your “Find” box to ensure you copied the entire string.
Step 5: Replace All
Click the “Replace All” icon (it looks like a small box with an arrow pointing to another box, located to the right of the “Replace” field).
VS Code will ask you to confirm. Click “Replace”.
VS Code will now go through every single file in your project, find that exact block of malware, and delete it. This may take a few seconds to a minute, depending on the size of your site.
You’re Not Done! What to Do Immediately After
You’ve cleaned the files, but the “hacker’s backdoor” is still open. You must do the following, or the malware will return.
Re-upload Your Clean Files: Delete the infected wp-content folder on your server and upload your newly cleaned wp-content folder via FTP/SFTP.
Change ALL Passwords: This is not optional.
WordPress Admin (all users)
cPanel / Hosting Account
FTP/SFTP Accounts
Update Everything: Outdated software is the #1 way hackers get in.
Run a full, high-sensitivity scan. It will check your core files and look for other backdoors you may have missed.
Remove Unused Plugins/Themes: If you’re not using it, delete it. Every inactive plugin is a potential security risk.
Check User Accounts: In your WordPress dashboard, go to “Users.” Look for any new admin accounts you didn’t create and delete them immediately.
Overwhelmed? Let a Professional Handle It.
This DIY guide can save you in an emergency, but a true malware infection runs deep. If the malware returns, or you’re worried you missed a backdoor, it’s best to get professional help.
I specialize in WordPress Virus Removal and site hardening. I’ll clean your site thoroughly, find the vulnerability that allowed the hacker in, and secure your website to prevent future attacks.
If you notice any weird stuff happening on your WordPress site, like strange posts or redirects to spammy casino pages, then you might be dealing with the “admnlxgxn” hack. This is a tricky malware attack that targeted thousands of WordPress sites in 2025 by adding fake users and backdoors to push gambling spam.
Yes, it is a serious issue, but don’t worry; today in this blog post, we will assist you in spotting the signs of this hack and how to remove malware from a WordPress site with proper WordPress malware removal steps. We will also share some tips to keep your site safe with WordPress malware cleanup, WordPress virus removal, and WordPress security hardening.
If you are worried and thinking, “My WordPress website is hacked!” or just want to stay ready, then we are here to guide you with simple steps for fixing a hacked WordPress site, removing viruses, and doing a full website hack repair.
Signs Your Website Might Be Hacked by “admnlxgxn“
The admnlxgxn hack is sneaky, but the signs are clear by which indicate that your website is hacked. However, a WordPress site that has been hacked with malware that can be spotted easily by finding these red flags below.
Fake “admnlxgxn” User in Admin Panel: Log into your WordPress dashboard and go to Users. If you see a user named “admnlxgxn” (or something similar) listed as an administrator, then it’s a big warning sign that your website is hacked. However, hackers create this fake user to control your site.
Suspicious Code in functions.php: Sometimes hackers hide a script in your theme’s functions.php file (found in wp-content/themes/your-theme/). This script will automatically create a new admnlxgxn user and prevent it from being removed, even if you attempt to delete it.
Sometimes the code is hidden (encrypted), and sometimes it shows clearly. You need to find it, and Wordfence’s sensitive mode, a WordPress malware scanner, can catch this malware backdoor.
Unknown Themes or Plugins: Spot any weird themes or plugins you didn’t install? These are often backdoors that hackers use to keep access. They might look legit, but are designed for a WordPress site redirecting to spam or injecting casino links.
Spam Posts or Redirects: Your site might suddenly have posts about online casinos or adult products, often with weird titles like “Pinco Casino Bonus 4815.” Visitors might also get redirected to sketchy sites, classic signs of a WordPress hacked site fix.
If any of these happened to your website, then don’t panic. You can clean a hacked WordPress website with the right steps. Now, let’s have a look at how to remove malware from a WordPress site and save a WordPress website.
How to Remove Backdoor Malware from Your WordPress Site?
To remove the admnlxgxn hack, you need to work a little bit, but you can do it. Follow these steps for WordPress malware cleanup to get your site back to normal. However, if you feel this is complicated, then you can always hire WordPress malware removal experts for a professional WordPress malware cleanup.
Backup Your Site (Do It Safely!): Before touching anything, back up your site. This saves your content in case something goes wrong during WordPress virus removal. Use trusted plugins like:
UpdraftPlus: Easy to use, saves backups to Google Drive or Dropbox.
All-in-One WP Migration: Great for full site backups.
Scan with Wordfence in Sensitive Mode: Now, install the Wordfence plugin (free version works fine) and run a scan in sensitive mode. It will scan carefully to uncover hidden malware, like secret scripts or fake users. Wordfence is one of the top WordPress malware scanners and will flag anything suspicious, like admnlxgxn-related malicious codes.
Remove Unknown Themes and Plugins: Some unknown fake themes and plugins don’t show up in the Appearance > Themes or Plugins section inside wp-admin. To find them all, use your hosting file manager, cPanel, or FTP to verify all the plugin and theme names in the wp-content/themes and wp-content/plugins folders.
If they do appear in the dashboard:
Under Appearance > Themes, please remove any themes you do not recognize.
Under Plugins, please remove any plugins that you did not install.
If you are not sure what’s legit, then compare with your site’s original setup or check with your developer.
Search Your Database for Malware: Moreover, Hackers Can Also hide spam in your WordPress database. Use a tool like phpMyAdmin (available in your hosting control panel) to search for:
Keywords like “admnlxgxn,” “casino,” or “Pinco.”
Suspicious links or scripts.
Delete any spam posts or comments you find. However, be careful before removing anything; only remove what is clearly malicious to avoid compromising your site.
Delete Fake Users Like “admnlxgxn“: In your WordPress dashboard, go to Users and delete the admnlxgxn user (or any unknown accounts). If it continuously happens to you, then check your theme’s functions.php file for a script creating them. Use FTP or your hosting file manager to access wp-content/themes/your-theme/functions.php and remove any weird code.
Reinstall Themes and Plugins: To stay safe, reinstall your themes and plugins to replace any infected files. Try the Force Reinstall plugin; it will make this super easy by reinstalling a fresh version from the WordPress repository without losing settings.
Update All Passwords: Change every password to lock and keep hackers out:
WordPress Admin: Update all user passwords in the dashboard.
FTP/SFTP: Reset all the credentials in your hosting panel.
cPanel/Hosting Account: Create a strong, new password.
Database: Update the database password in wp-config.php.
Use long, random passwords (at least 12 characters) with letters, numbers, and symbols.
Double-Check and Monitor: Run another Wordfence scan to confirm that malware is gone. Also, check your site in Google Search Console for any “hacked content” or warnings. Keep an eye on logs regularly for a few weeks to ensure no new unusual activity appears.
Once you have cleaned your site, it is now time to protect it with website security and malware protection for WordPress. Here’s how:
Use a Firewall: Install a WordPress firewall and security plugin, such as Wordfence or an all-in-one WP Security plugin, to block malicious traffic.
Keep Everything Updated: Regularly update WordPress, themes, and plugins to fix security weaknesses.
Strong Passwords & 2FA: Use complex passwords and add two-factor authentication (2FA) for extra security.
Limit Login Attempts: You can use plugins like Limit Login Attempts Reloaded to stop hackers from guessing passwords.
Regular Scans: Once a week, schedule a scan with a WordPress malware scanner to catch issues early.
Backup Often: Set up automatic backups with UpdraftPlus so you’re always prepared.
For extra safety, consider a WordPress security service provider that offers website security and malware protection for WordPress.
Why You Should Act Fast
The admnlxgxn hack isn’t just annoying, it can hurt your SEO, take your visitors away, and even get your site blacklisted by Google. Acting quickly with a WordPress website malware removal service or hiring WordPress malware removal experts will help you to fix a hacked WordPress site before it gets worse.
Wrap-Up: Take Control of Your Site Today
Dealing with a WordPress site hacked with malware like admnlxgxn is painful and unexpected, but you can fix it. Use our guide to remove malware from a WordPress site, secure it with WordPress malware protection, or hire a professional WordPress malware cleanup team if needed.
Don’t let hackers ruin your hard work; take action now with strong website security and malware protection for WordPress.
Verify Integrity: Use WordPress Checksums to find modified core files.
Hunt Ghost Assets: Manually compare File Manager folders vs. Dashboard lists to find hidden plugins.
Database Scrub: Search for hidden <script> tags and “Ghost Admin” users.
Hardening: Reset security salts and disable file editing.
Is your WordPress site redirecting to spam? Are you seeing “403 Forbidden” errors or a blank white screen?
Stop. Don’t panic.
In my 7+ years as a Web Developer & Security Specialist, I have fixed over 4,500 hacked websites. I have seen infections that expensive security plugins completely miss—like “Ghost” plugins that don’t show up in your dashboard and hidden admin users buried deep in your database.
Why trust this guide?
Because I don’t just click “scan.” I analyze the code. Most “security experts” rely solely on automated tools. As a developer, I manually inspect your SQL database and JavaScript files to find the backdoors that bots can’t see.
The good news? It is fixable.
The bad news? Clicking “clean” on a plugin isn’t enough. You need a surgical approach.
In this guide, I will show you the exact Hybrid Method I use: starting with a scan, but finishing with deep manual cleaning.
Step 1: Confirm the Infection (It’s Not Just Redirects)
Malware doesn’t always look like a “Hacked by…” screen. Often, it looks like a broken server or invisible SEO spam.
Common Symptoms I See Daily:
The “Error” Screens: You might see a 500 Internal Server Error, a 403 Forbidden message, or just a blank White Screen of Death. This is often caused by malware corrupting your .htaccess file.
Japanese/Gibberish Spam: Google indexes thousands of pages you never created. This is the Japanese Keyword Hack.
Hosting Suspension: Your host (Godaddy, Bluehost, SiteGround) shuts you down for “Resource Usage” caused by a mining script.
Step 2: Lock It Down & Backup
Before you start surgery, you must stop the bleeding.
Change Passwords: Immediately change your Hosting (cPanel) and FTP passwords. If you can access the dashboard, change your Admin password.
Enable Maintenance Mode: Use a lightweight plugin like SeedProd to put up a “Under Maintenance” screen. This stops users from being redirected to malware while you work.
The “Clean” Backup: Take a full backup of your Files and Database.Warning: Do not restore an old backup yet. We want to clean the current site to ensure we don’t lose your recent data. Save this backup to your local computer, not the server.
Step 3: The “Hybrid” Scan (Plugin + Manual)
Most guides tell you to just run a plugin. I recommend a Hybrid Approach.
1. Run a Wordfence Scan (The Baseline)
Install Wordfence (Free version is fine) and run a scan. It is excellent at finding known malware signatures.
Crucial Tip: Note the infected files, but don’t just click “Delete” yet. If it identifies a core file like wp-load.php, deleting it will break your site. We will replace these in the next step.
2. The Manual “Ghost” Check (What Scanners Miss)
Plugins often miss sophisticated “Ghost” malware. Here is how to find them manually:
The Plugin/Theme Count Test:
Go to your WordPress Dashboard > Plugins. Count how many are installed (e.g., 12).
Now, open your File Manager (cPanel) and go to wp-content/plugins. Count the folders.
The Red Flag: If you see 13 folders but only 12 plugins in the dashboard, that extra folder (often named something like wp-security-patch or cache-optimizer) is likely hidden malware. Delete it immediately.
The Checksum Verify: If you have WP-CLI installed, run wp core verify-checksums. This compares your core files against the official WordPress repository. Any mismatch indicates a hacked file.
The “Last Updated” Date: In File Manager, look at the “Last Modified” date of your index.php, header.php, and footer.php. If they were modified yesterday, but you haven’t updated your site in months, they contain injected code.
Step 4: Advanced Detection (Terminal & Network)
If you are a developer or have SSH access, use the power of the terminal. It is faster and more accurate than any plugin.
Grep Command for Backdoors:
Run this command to search for common obfuscated malware functions (like eval and base64_decode) inside your uploads or theme folders:
grep -rnw './wp-content/' -e 'eval('
Check the Network Tab:
Open your site in Chrome Incognito mode. Right-click > Inspect > Network Tab. Reload the page. Look for requests going to strange domains. If you see your site loading JavaScript from a random .xyz or .ru domain, that is the source of your redirect.
Step 5: Database Surgery (The Hidden Admin Trick)
This is where 90% of cleanup attempts fail. You might delete the malware files, but if the hacker has a secret Admin account, they will just log back in.
Warning: Hackers can hide users from your WordPress “Users” screen. You must check the database directly.
Log in to phpMyAdmin.
Open the wp_users table.
Look closely: Do you see a user named admin, 101, x00, or a strange email address? If you see a user here that does not show up in your WordPress dashboard, delete the row immediately.
Search for SEO Spam:
Click the “Search” tab in phpMyAdmin. Search your wp_posts table for:
<script (Malicious JS injection)
position:absolute (Hidden SEO spam text)
display:none (Hidden links)
Hackers often hide spam links using CSS (left:-9999px) so you can’t see them, but Google can.
Step 6: Replace Core Files (The Nuclear Fix)
If Wordfence found issues in wp-admin or wp-includes, do not try to “clean” the code. Replace the files.
Download a fresh copy of WordPress from wordpress.org.
Unzip it on your computer.
Delete the wp-content folder from this new download (so you don’t overwrite your images/themes).
Upload the remaining files (wp-admin, wp-includes, and root files) to your server via FTP, selecting “Overwrite”.
This guarantees that your core system files are 100% clean and original.
Step 7: Post-Cleanup Hardening
Once the malware is gone, you must lock the door so they can’t get back in.
Update Security Salts: Go to the WordPress Salt Generator. Copy the code and replace the matching lines in your wp-config.php file. This instantly logs out all users (including hackers).
Disable File Editing: Add this line to your wp-config.php file to stop hackers from editing files via the dashboard:define('DISALLOW_FILE_EDIT', true);
Deep Cache Purge: Clear your server cache (LSCache/Varnish), your CDN (Cloudflare), and your browser cache. Malware often “lives” in the cache even after you fix the file.
If you’ve tried these steps and the malware keeps coming back, or if the idea of editing phpMyAdmin scares you, don’t risk breaking your site further.
I have cleaned 4,500+ sites with a 100% success rate. I don’t use automated “quick fixes.” I perform the deep, manual cleaning described in this guide to ensure your site stays clean.
JavaScript malware infections have become increasingly sophisticated, with recent campaigns affecting thousands of websites worldwide. One particularly dangerous variant has been targeting WordPress and Node.js applications, specifically those hosted on cPanel environments. This malware employs advanced obfuscation techniques to evade detection while establishing persistent backdoor access to compromised websites.
What is This JavaScript Malware?
This malware is a highly obfuscated JavaScript injection that targets web applications, particularly WordPress sites and Node.js applications. The infection spreads by infecting all writable JavaScript files on the server, creating a persistent presence that’s difficult to completely remove.
Key Characteristics:
Multi-file Infection: Spreads across thousands of JavaScript files
Heavy Obfuscation: Uses advanced code obfuscation to avoid detection
Persistent Backdoor: Maintains access even after initial cleanup
Cross-platform: Affects both WordPress and Node.js environments
Technical Analysis of the Malware Code
Let’s break down the malicious code structure:
1. Obfuscation Layer
if(typeof cqxq==="undefined"){
    (function(W,y){
        var A=a0y,h=W();
        while(!![]){
            try{
                var e=-parseInt(A(0xa1,'qcC%'))/(0x124a+0xdaf+-0x1ff8)*
                // Heavy mathematical obfuscation continues...
The malware starts with a check for the cqxq variable to prevent re-execution. It then uses a complex mathematical obfuscation scheme with hexadecimal values to hide its true purpose.
2. HTTPClient Implementation
var HttpClient=function(){
    var H=a0y;
    this[H(0x94,'hG7i')]=function(W,y){
        var j=H,h=new XMLHttpRequest();
        // Establishes communication with command & control server
The malware creates an HTTP client to communicate with command and control (C2) servers, allowing remote attackers to execute commands on infected websites.
3. Token Generation System
rand=function(){
    var K=a0y;
    return Math[K(0x72,'Ksot')+K(0xa9,'MH^(')]()
    [K(0xb8,'p]0[')+K(0xae,'ydx2')+'ng'](0x1013+-0xc*0x2ce+-0xd*-0x15d)
    [K(0x8d,'e!tf')+K(0xa8,'jYYK')](-0x159b*0x1+-0x1e46+-0x33e3*-0x1);
},
token=function(){return rand()+rand();};
The malware generates random tokens for authentication with the C2 server, making detection more difficult.
4. Deobfuscation Function
function a0y(W,y){
    var h=a0W();
    return a0y=function(e,u){
        e=e-(0xe76+-0x3a*-0x3d+-0x1bd6);
        var S=h[e];
        if(a0y['sudkJi']===undefined){
            // Complex string decryption process
The malware includes its own deobfuscation function that dynamically decrypts strings and function calls at runtime.
VS Code will show you all matches across all files
Review the matches to ensure they’re malware (not legitimate code)
Confirm replacement to remove all instances
Step 4: Manual Verification
After bulk replacement, manually check some files:
// Look for any remaining suspicious patterns:
// - Obfuscated function names (a0y, a0W, etc.)
// - Heavy mathematical operations in hexadecimal
// - XMLHttpRequest implementations with random tokens
// - Base64 encoded strings
Step 5: Additional Cleaning Patterns
Search and replace these additional patterns in VS Code:
Pattern 1: Function declarations
Search: function a0y\([\s\S]*?\}
Replace: (empty)
Pattern 2: Variable declarations
Search: var cqxq=!!.*?;
Replace: (empty)
Pattern 3: Obfuscated arrays
Search: function a0W\(\)\{[\s\S]*?\}
Replace: (empty)
Step 5: Security Hardening
# .htaccess rules to prevent future infections
<Files "*.js">
    Order Allow,Deny
    Allow from all
    <FilesMatch "\.(php|phtml|php3|php4|php5|pl|py|jsp|asp|aspx|sh)$">
        Deny from all
    </FilesMatch>
</Files>

# Prevent access to sensitive files
<Files ~ "^\.">
    Order allow,deny
    Deny from all
</Files>
# Set up file integrity monitoring
find /public_html -type f -name "*.js" -exec md5sum {} \; > js_hashes.txt
4. Security Headers
# Add security headers
Header always set X-Content-Type-Options nosniff
Header always set X-Frame-Options DENY
Header always set X-XSS-Protection "1; mode=block"
Header always set Content-Security-Policy "script-src 'self'"
What Makes This Malware Dangerous?
1. Advanced Obfuscation
Over 25% of malicious JavaScript uses obfuscation techniques, making this malware particularly challenging to detect and remove.
2. Persistence Mechanisms
The malware creates multiple infection points, making complete removal difficult without proper tools and expertise.
3. Data Harvesting Capabilities
The C2 communication allows attackers to:
Steal sensitive user data
Inject additional malware
Use your site for SEO spam
Launch attacks on other websites
Professional Removal Services
If you’re dealing with this infection, consider professional help. Malware campaigns have become increasingly sophisticated, switching between different techniques to maintain persistence.
This JavaScript malware represents a significant threat to WordPress and Node.js websites, particularly those hosted on cPanel environments. Its sophisticated obfuscation and persistence mechanisms make it challenging to remove without proper expertise.
Key takeaways:
Regular monitoring and updates are essential
Professional removal may be necessary for complete cleanup
Implement proper security measures to prevent reinfection
Always maintain current backups of your website
Stay vigilant and keep your websites secure. If you suspect an infection, act quickly to minimize damage and protect your visitors’ data.
Need Help? If you’re struggling with this malware infection, don’t hesitate to seek professional assistance. Quick action can prevent further damage and protect your website’s reputation.
If your WordPress site is suddenly showing Google AdSense ads, banner ads, or popup ads that you never added — and especially if visitors are also reporting strange mobile redirects you can’t reproduce yourself — your site has been hacked. An attacker has injected their own AdSense publisher ID into your pages so your traffic generates ad revenue for them, not you. The injected code is usually stored as entries in your WordPress database (often hidden inside a Header/Footer code manager plugin), which is why it survives plugin deactivation, theme switches, and surface-level malware scans. Removing it requires cleaning the database entries, finding the persistence mechanism that’s putting them back, and closing the original entry point.
Quick Answer: Why ads are showing on your WordPress site that you never added
What it is: a fake AdSense injection — your site is hacked and an attacker is monetizing your traffic with their publisher ID
Where it usually hides: in your database, often inside Header Footer Code Manager or similar code-injection plugins
Why deactivating plugins doesn’t fix it: the malicious code lives in wp_options or post meta, not in plugin files
How to confirm it’s malware: check the data-ad-client or ca-pub-XXXXXXXX publisher ID in the injected script — it won’t be yours
How to fix it: remove the database entries, find the source that’s recreating them, audit users and backdoors, then close the entry point
There’s a particular moment site owners describe to me when they reach out. They’re browsing their own website, often from a phone, often a few days after the infection started, and they suddenly see a Google ad load on a page that has nothing to do with advertising. Sometimes a popup. Sometimes a banner that wasn’t there yesterday. Sometimes a mobile-only redirect that sends them to a completely unrelated site.
The first reaction is always confusion. “Did a plugin do this? Did my developer add tracking? Is this from my hosting provider?” The second reaction, once they check, is realizing they never set up AdSense on this site at all.
If that’s where you are right now, this guide walks through exactly what’s happening, why the ads are showing up, why deleting the obvious-looking plugin usually doesn’t fix it, and what a real cleanup actually looks like — including a real client cleanup I worked on where this exact malware family was injected through a legitimate-looking code-injection plugin and required full database remediation to remove.
Injected AdSense scripts loading across a site whose owner had never set up AdSense.
What Site Owners First Notice
The symptoms cluster in a recognizable pattern. If three or more of these match what you’re seeing, you almost certainly have an AdSense injection:
Google ads appearing on pages where you never installed AdSense
Popup advertisements opening when visitors load or click anywhere on your site
Banner ads in the header, footer, or sidebar that you didn’t place there
Mobile-only redirects — desktop visitors see a normal site, mobile visitors get sent to spam or app-install pages
Visitors reporting strange behavior that you can’t reproduce on your own machine
Sudden drops in time-on-page or conversion rates with no other changes that would explain it
Increased server resource usage from the extra ad scripts loading on every page
An “AdSense” or similar plugin in your dashboard that you don’t remember installing
The combination most clients describe is “ads on my site + people complaining about popups + nothing in my plugins that obviously explains it.” That’s the fingerprint.
What’s Actually Happening
Someone has gained write access to your WordPress site — usually through a vulnerable plugin, a stolen admin password, or a nulled theme — and injected their own Google AdSense code into your pages. Their AdSense account, not yours.
Every time a visitor loads your site, the injected ad scripts run and serve ads. Every click on those ads sends ad revenue to the attacker. Your site becomes a passive income source for someone you’ve never met, while you absorb all the costs: damaged user experience, slower page loads, lost trust, and (if Google notices) potential search visibility issues.
The injected code typically looks like this in your page source:
The critical detail: that ca-pub-XXXXXXXX publisher ID is the attacker’s, not yours. If you don’t have a Google AdSense account, that ID has no business being on your site at all. If you do have AdSense but didn’t put the code there, compare the publisher ID — if it doesn’t match yours, you’re looking at the attacker’s account.
This is a malware family that security scanners flag under signatures like rogueads2unwanted_adsense and similar variants. But many infected sites pass scanner checks anyway, because of where the malicious code actually lives.
Scanner confirmation of the rogue AdSense JavaScript family — but most infections also include parts the scanner can’t see.
A Real Client Cleanup: Where This Malware Actually Lives
To make this concrete, here’s how a recent cleanup of this exact malware family unfolded. The client reached out after their WordPress site started showing AdSense ads, popup advertisements, and mobile redirects to suspicious third-party pages. They had never set up AdSense.
When I reviewed the site, the visible scripts looked like the code block above. But the source of those scripts wasn’t where most site owners would think to look.
The malware wasn’t in the plugin files
The infection was tied to the site’s Header Footer Code Manager setup — a legitimate, popular WordPress plugin used to inject custom HTML or JavaScript into page headers and footers. The plugin itself wasn’t malicious. It was being abused as the delivery vehicle.
The attacker had stored their AdSense scripts as snippet entries inside the plugin’s database tables. When WordPress rendered any page, the plugin dutifully read those snippets from the database and injected them into the HTML output, exactly as it was designed to do for legitimate use cases.
Why the obvious cleanup attempts failed
The client (and a previous helper) had already tried the obvious fixes:
Deactivating the plugin → ads briefly disappeared, but the malicious snippets remained in the database, and reactivating the plugin (or installing a similar one) brought them right back
Deleting suspicious-looking files in the file system → didn’t help, because the payload wasn’t in a file
Running a security scanner → flagged the JavaScript family but didn’t remove it, because removal required database-level access the scanner didn’t have
Manually editing the affected pages → the snippets were rendered dynamically, so editing individual pages did nothing
This is a textbook example of why WordPress malware keeps coming back — the visible symptom and the actual location are in different places.
What actually worked
The successful cleanup required:
Identifying the exact database entries (in wp_options and the plugin’s own tables) that contained the injected ad code
Removing those entries directly through phpMyAdmin
Auditing the rest of the database for related malicious entries that could re-inject the code
Reviewing the file system for any backdoor PHP file that could be writing to the database when triggered
Verifying core WordPress integrity and checking for additional compromise points
Closing the original entry point — outdated software in this case — so the attacker couldn’t simply walk back in
After cleanup, the popups stopped, the mobile redirects ended, and the unauthorized AdSense scripts disappeared from the rendered HTML. But the lesson worth taking from this case isn’t the cleanup steps. It’s the location.
Database injections are the single biggest reason DIY cleanups of fake AdSense malware fail. If you only check files, you’ll never find this.
Why Deactivating Plugins Doesn’t Fix It
This is the part that traps most site owners. They search through their plugin list, find something that looks ad-related (or sometimes a Header/Footer Code Manager plugin they don’t fully recognize), deactivate it — and the ads don’t go away. Or they go away briefly and come back hours later.
Here’s what’s actually happening:
The injected ad code isn’t sitting in a plugin file you can delete. It’s stored as rows in your WordPress database, usually in one of these places:
The wp_options table — particularly entries created by code-injection plugins like Header Footer Code Manager, Insert Headers and Footers, or similar tools that legitimately store custom HTML/JS in the database
The wp_postmeta table — sometimes attached to specific posts to make detection harder
Custom database tables added by suspicious plugins the attacker installed for this purpose
The pattern I see most often is the attacker abusing an already-installed Header/Footer code injection plugin. The plugin itself is legitimate. But because it’s designed to inject arbitrary code into every page header or footer, it’s the perfect vehicle: an attacker who gets database access drops their AdSense scripts into the plugin’s stored snippets, and now every page on your site loads the malicious code.
When you deactivate the plugin, the database rows stay. When you reactivate it (or install a similar plugin), the injection comes right back. When you delete the plugin entirely, sometimes the database rows still don’t get cleaned up — and if there’s a backdoor elsewhere on the site, the attacker simply reinstalls a new injection vector.
This is why so many DIY cleanups fail on this specific malware family. The visible symptom (ads) and the actual location (database) are in different places.
How to Confirm What You’re Seeing Is Malware
Before assuming it’s a hack, rule out the legitimate alternatives:
1. Check the publisher ID
Open your site, view the page source (right-click → View Page Source), and search for ca-pub-. If you see one or more publisher IDs and you have a Google AdSense account, log into AdSense and compare. If they don’t match, the ad code isn’t yours.
If you’ve never had an AdSense account at all and there’s any ca-pub- code on your site, it’s malware. There is no legitimate reason for AdSense scripts to be on a site whose owner doesn’t have an AdSense account.
2. Check for unfamiliar plugins
Go to Plugins → Installed Plugins and look for anything you don’t recognize, especially:
Plugins with vague names like “WP Stats,” “WP Helper,” “Site Helper”
Header Footer Code Manager or Insert Headers and Footers plugins you don’t remember installing
Plugins with no recent updates and no description
Plugins where the author’s WordPress.org page no longer exists or doesn’t match
If you find any, screenshot them but don’t delete yet — you’ll want the evidence trail for the full cleanup.
3. Check for unfamiliar admin users
Go to Users → All Users and filter by Administrator role. Any admin account you don’t personally recognize is a strong indicator of compromise. The walkthrough in how to find and remove hidden admin users in WordPress covers what to look for and how attackers hide them.
4. Test from incognito mode and a mobile device
Some injection patterns only fire under specific conditions — first-time visitors, mobile user agents, visitors arriving from search engines. Open your site in an incognito window. Open it on your phone. If the popups or redirects only show in those contexts, you’ve confirmed it’s a conditional injection (which is a malware fingerprint, not a legitimate ad setup).
The Real Cleanup (What Actually Works)
Once you’ve confirmed it’s a hack, the cleanup has to address all three layers: the visible ad code, the persistence mechanism that’s reinjecting it, and the original entry point that let the attacker in.
Step 1: Snapshot before changing anything
Take a full backup (files + database) before you touch anything. You’ll want it for two reasons: a working safety net if cleanup goes wrong, and forensic evidence if you need to trace patterns. Save the malicious database rows (with their values) to a separate text file before deletion.
Step 2: Remove the injected code from the database
The fastest way is through phpMyAdmin or your hosting provider’s equivalent database tool. Search for fragments of the injected code — particularly the unfamiliar ca-pub- ID, googlesyndication, or adsbygoogle — across the wp_options and wp_postmeta tables.
For each row that contains the injected ad code, you have two options:
If the row is purely malicious (a snippet entry that only contains the rogue ads), delete the row entirely
If the row mixes legitimate content with injected code (rare, but happens), edit the row and remove only the malicious portion
If you find Header Footer Code Manager, Insert Headers and Footers, or any similar plugin installed and you don’t actively use it, remove it entirely. If you do use one of these legitimately, open it and review every snippet — anything you didn’t personally add should be deleted from inside the plugin’s interface, not just from the database (otherwise the plugin may regenerate the row).
Step 4: Find and remove the persistence mechanism
The injection had to come from somewhere. Common persistence patterns I find on these cleanups:
Hidden admin users who recreate the database entries
Scheduled WordPress cron tasks that re-inject the code on a timer
Backdoor PHP files in wp-content/uploads/, fake plugin folders, or theme files that write to the database when triggered
Modified core or theme files with code that calls a remote server and updates the database based on its response
Step 5: Reinstall WordPress core, plugins, and themes from clean sources
Don’t trust visual inspection. Download fresh copies from WordPress.org and the original plugin/theme developers, and overwrite all the files. Throw away anything nulled or pirated — these often ship with backdoors built in (why nulled WordPress plugins and themes are a security disaster).
Step 6: Rotate every credential
WordPress admin, hosting cPanel, FTP/SFTP, the database user, and any email accounts that received password resets during the compromise. Also rotate WordPress security keys (the salts in wp-config.php) to invalidate any active session the attacker still has.
Step 7: Verify the cleanup
Reload your site in incognito mode, on a mobile device, and from a different network. View the page source and search for ca-pub-, googlesyndication, and adsbygoogle. None of those should appear anywhere unless you have a legitimate AdSense setup of your own.
A lot of site owners initially treat this as a cosmetic annoyance — “I’ll get to it next week.” The hidden costs add up faster than people expect:
Lost revenue. Every visitor on your site is generating ad income for the attacker instead of converting on whatever your site is actually for.
Brand damage. Visitors associate your domain with intrusive popups and shady redirects. Even after cleanup, that perception sticks.
SEO risk. Mobile redirects and intrusive interstitials can trigger Google’s “intrusive interstitial” penalties. Suspicious script behavior can also lead to Safe Browsing flags or “this site may be hacked” warnings in search results.
Hosting risk. Some hosts will suspend accounts that serve malicious-looking ad behavior, especially if other customers complain.
Cross-customer reputation damage. If you sell services or products, the popups visitors encounter create a negative first impression that’s hard to recover from.
Conditional payloads can escalate. The same injection mechanism delivering AdSense today can deliver credential phishing, fake browser updates, or a redirect to a scam site tomorrow. The attacker controls what runs.
Knowing how the attacker got admin or database access in the first place is what determines whether the cleanup actually holds. The most common entry points I trace back to on these cleanups:
Outdated plugins with known exploits. A plugin that hasn’t been updated in months almost always has a public CVE attached to it.
Nulled or pirated themes/plugins. “Free” premium plugins from unofficial sources frequently ship with backdoors pre-installed — exactly the kind that allow database injection without leaving an obvious entry point.
Weak or reused admin passwords. Credential stuffing attacks try huge lists of leaked passwords against WordPress logins.
Compromised hosting accounts. If another site on your shared hosting account is hacked, attackers can sometimes pivot to yours.
Outdated WordPress core. Less common as an entry point in 2026, but still happens on neglected sites.
Missing two-factor authentication. Without 2FA, a single leaked admin password is the whole game.
Once you’ve cleaned the site, the goal shifts from removal to prevention. The measures that actually move the needle, in order of impact:
Update WordPress core, plugins, and themes promptly. Most fake AdSense injections trace back to a known plugin vulnerability that had a patch available.
Remove plugins you don’t actively use. Inactive plugins still ship code that can be exploited.
Audit your code-injection plugins. If you have Header Footer Code Manager, Insert Headers and Footers, or similar tools installed and you’re not actively using them, uninstall them.
Use strong, unique passwords with two-factor authentication. Both on WordPress and on your hosting cPanel.
Enable file integrity monitoring. Most security plugins can alert you when database options change unexpectedly or when new files appear in places they shouldn’t.
Install a real Web Application Firewall (WAF). Wordfence, Sucuri, Cloudflare WAF, or your host’s built-in firewall — they all reduce the attack surface.
Keep off-host backups. Backups stored on the same server as the site can be infected along with everything else.
Monitor your site’s outbound script references. A periodic check of your page source for unfamiliar script tags is a quick early-warning system.
FAQ
I don’t have an AdSense account but my site is showing AdSense ads. What does that mean?
It means your site is hacked. There is no legitimate way for AdSense scripts to appear on a site whose owner has never set up an AdSense account. The ads are running on the attacker’s account, and every impression and click sends revenue to them.
How do I find the attacker’s publisher ID on my site?
Open your site in a browser, right-click and choose “View Page Source,” then search the source for ca-pub-. Any publisher ID that appears (especially one you don’t recognize) is the attacker’s.
I deactivated the plugin that was injecting the ads but they came back. Why?
Because the injected code is stored in your database, not just in the plugin files. Deactivating the plugin temporarily stops the injection from rendering, but the malicious database entries remain. When you (or the attacker) reactivate the plugin or install a similar one, the entries are read again and the ads return. The fix requires removing the database rows directly.
Why didn’t my security plugin detect this?
Many security plugins are tuned to scan files for known PHP backdoor patterns. AdSense JavaScript stored as a string in the WordPress database doesn’t match those patterns — it’s syntactically valid HTML/JS that legitimate plugins routinely store in the same place. Database-side malware needs a scanner that specifically scans the database, and even those miss the more sophisticated variants.
Should I just delete every code-injection plugin to be safe?
If you’re not actively using one, yes. If you do use one (some sites legitimately need them for analytics scripts, custom HTML, or third-party integrations), keep it but audit the snippets inside the plugin’s interface and remove anything you didn’t personally add.
The ads are on my site, but my AdSense account is in good standing. Could Google ban my AdSense for this?
Possibly. If the rogue ads are running under a different publisher ID, your account isn’t directly affected. If — somehow — your own publisher ID has been hijacked and used in the injection, that’s a separate problem and you should report it to Google AdSense immediately. Either way, if Google’s crawler picks up suspicious script behavior on your domain, it can affect your search visibility regardless of which AdSense account is involved.
How long will it take Google to stop showing search warnings about my site after cleanup?
If your site picked up a “This site may be hacked” or Safe Browsing warning, you can request review through Google Search Console after cleanup. Reviews typically take 24–72 hours. Until cleanup is verified, the warnings stay. If you’re in this situation, my Google blacklist removal service covers the review process.
Could the same injection mechanism be used to deliver something worse than ads?
Yes — and this is the underrated risk. The same plugin/database mechanism that’s currently delivering AdSense scripts can be repurposed at any time to deliver credential-stealing forms, fake browser update prompts, redirects to phishing sites, or e-commerce skimmers. Whatever the attacker chooses to put in the snippet runs on every page load. Treat the AdSense version as a warning shot, not the worst-case scenario.
Need Help Removing Fake AdSense Malware From Your WordPress Site?
If your site is showing unauthorized ads, popups, or mobile redirects, and the obvious fixes haven’t worked, the issue is almost certainly in your database — and the cleanup needs to go further than file scans alone.
I’ve cleaned more than 4,500 hacked WordPress websites since 2018, including dozens of fake AdSense and rogue ad injections like the one described in this post. If you’re not confident handling database-level cleanup yourself, or if you’ve already tried cleaning and the ads keep coming back, this is exactly the kind of case I work on every week.


![Website Redirecting to getfix[.]win: How to Detect, Remove, and Prevent This Malware](https://cms.mdpabel.com/wp-content/uploads/2025/11/redirect-malware.png)